So, with Christmas only two weeks away, I am running behind on preparations for my Christmas cake. I should have cut up my fruits and nuts and soaked them in rum weeks ago. But life seemed to have gotten in the way and that hadn't happened as yet. So, I had earmarked today to get my cake prep going.
Anyway, long story short, I spent most of the day dreaming about how I'd like to set my table for Christmas! So, now the day is almost over, the fruits and nuts remain uncut in the pantry... but... I have the prettiest napkin fold that I'm going to use at the table this Christmas :)
Don't judge me... this happens to the best of us...
HOW TO FOLD NAPKINS INTO A CHRISTMAS TREE- STEP BY STEP TUTORIAL
This fold works best with a perfectly square napkin. My napkin is not completely square, but hey, that's all I have, so it will have to do. Plus, I bought these adorable linen Christmas tree napkins last year and have every intention of using them this year.
STEP 1- START WITH A SQUARE
Fold the napkin into four and line it up into a diamond shape so that the 4 open layers are toward you.
STEP 2: MAKE TRIANGLES
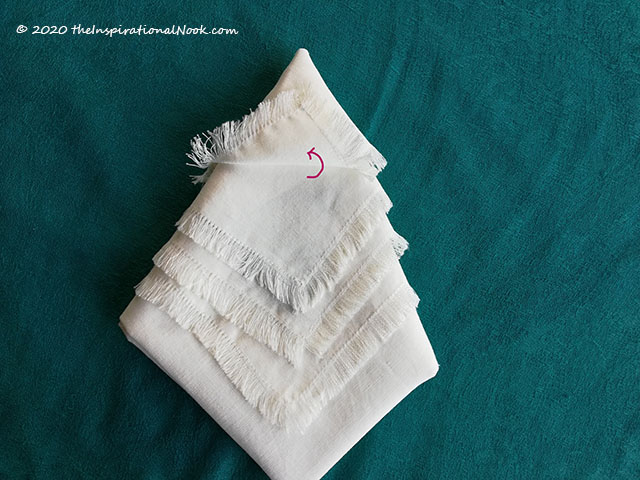
Fold the first layer upwards to meet the opposite corner and to form a little triangle. Be sure to keep the triangle a few centimeters away from the edge.
Do the same, for layer 2, 3 and 4 making sure to keep the sides of each of the previous triangles slightly exposed.
You should be left with 5 overlapping triangles.

STEP 3: FLIP ON IT'S BACK
Now, carefully, without unfurling your triangles, put your hand over the folded napkin and flip the entire napkin onto it's back. (Much like flipping a burger). Below is what it will now look like.
STEP 4: FOLD INWARDS
Fold the right side of the napkin inwards, to create a sharp point at the bottom, that lines up (in my case, almost lines up) with the top point.

Now, fold the left side of the napkin inwards, to overlap the previous fold. You now have a nice, sharp point at the bottom (pink point).

Remember that you are still on the 'back' side of the napkin.
STEP 4: FLIP ON IT'S FRONT
Now, carefully and without changing the orientation, flip the entire napkin onto it's front.
Below, is what it should now look like.

See how the fringes are pointing upwards and the sharp pink point is still at the bottom.
That sharp point is going to be the top of the Christmas tree.....so.....
STEP 5: CREATE THE TREE TOP
The next step is to rotate the napkin 180° so that that the pink point is now oriented upwards. And that's the tree top.
See how the fringes are now pointing downwards.
STEP 6. CREATE THE BRANCHES
Take the top fringed layer and fold it back.
Repeat with the second fringed layer.
However, this time tuck layer 2 under layer 1.
Keep going....you're almost there....
Until the final 5th layer is tucked under the 4th.... and there's your tree.
STEP 7: DECORATE THE TREE
Center the tree on a serving plate. Top it with a star anise and add a stick of cinnamon for the trunk... though I'm thinking that perhaps a chocolate pirouette wafer might be a tastier alternative to the cinnamon.
Now isn't that just delightful?
Check out my other craft ideas, by clicking on DIY below.


